
Wednesday, January 16, 2013
FO#1 2013
Tuesday, January 15, 2013
Happy Potty Day!
Perhaps a "crappy" title, but appropriate, nonetheless....you see Saturday was all about the potty. Let me give you the "poop"...
It was warm enough (high 40's) to allow our bees to take a cleansing flight.
 You see, bees don't go to the bathroom in the hive. So they spend the winter with little legs crossed, waiting for a warm enough day to "take care of business". It also means for us (anxious beekeepers) that we get to see that the hive has survived so far...
 Temperatures were also warm enough that hibernating bears woke up for a mid-winter snack...my neighbor/friend lost a hive to a foraging bear the same day (major bummer!)
And keeping with the waste removal theme...
 Here is the riser, or opening to our septic tank. Why am I taking a picture of that, you ask? Well, it turns out that Saturday was also the day we had to have an emergency visit from the Septic Folks to deal with a blocked septic tank. Fun.
Actually, I dug the riser out myself as a part of my trying to diagnose the problem. Only the unnaturally curious or seriously poor/cheap do that sort of thing - but it paid off. I saved $45 off the service call. Do you know where your tank is? (Might be a good idea to check that out, and mark it! )
All is fixed....so it really was a happy potty day!
It was warm enough (high 40's) to allow our bees to take a cleansing flight.


And keeping with the waste removal theme...

Actually, I dug the riser out myself as a part of my trying to diagnose the problem. Only the unnaturally curious or seriously poor/cheap do that sort of thing - but it paid off. I saved $45 off the service call. Do you know where your tank is? (Might be a good idea to check that out, and mark it! )
All is fixed....so it really was a happy potty day!
Wednesday, January 09, 2013
Sprouts!
Love, love, love my winter sprouts! Probably all the more because I can't get into the garden, and they are the closest thing to farming right about now...

These are organic alfalfa sprouts and cost me about 35 cents to grow. Compare that to $2.99 at the grocery....
We use a large mason jar. The lid is replaced with 2 circles of screen, cut from repair screen we had on hand, and placed in the rim so that the gridwork of the screen is reduced by the overlapping holes/wires. Large enough for water to drain, and small enough to keep the smaller sprout seeds from washing down the drain.
 Throw in a few Tablespoons of sprout seeds, cover with water and soak for an hour. Drain off the water, and put in a dark cupboard. Next day, and each day, rinse with water, swirl well, and drain. After 4 days or so, you should have decent sprout growth:
 From here on out, place the jar in/near a sunny window so the sprouts will leaf and green. They usually take 7-8 days. Store in fridge. Or eat. Immediately.
NOTE: I choose to live life on the edge. Therefore, I disregard the warning on the organic seed packets required by the litigation-fearing lawyers who represent the seed company. Rinsing my sprouts in a bleach solution just doesn't sound like a good idea. You make the call.


These are organic alfalfa sprouts and cost me about 35 cents to grow. Compare that to $2.99 at the grocery....
We use a large mason jar. The lid is replaced with 2 circles of screen, cut from repair screen we had on hand, and placed in the rim so that the gridwork of the screen is reduced by the overlapping holes/wires. Large enough for water to drain, and small enough to keep the smaller sprout seeds from washing down the drain.


NOTE: I choose to live life on the edge. Therefore, I disregard the warning on the organic seed packets required by the litigation-fearing lawyers who represent the seed company. Rinsing my sprouts in a bleach solution just doesn't sound like a good idea. You make the call.

Thursday, January 03, 2013
Knit faster, dammit!
It's COLD!!!! That's what the chickens are saying.....hoping to get some poultry lingerie...I am sure. It dipped WELL below zero the last two nights. It's the kind of weather that makes me want to do NOTHING more than cozy up on the couch with some knitting....
 These socks languished on the needles all during December - not for lack of interest - but because I got practically zero knitting time (dratted job!). The pattern is mine - anyone wanting a copy should e-mail me, or shout out in the comments section. It will eventually be up on the website/Ravelry, but that may take a while....
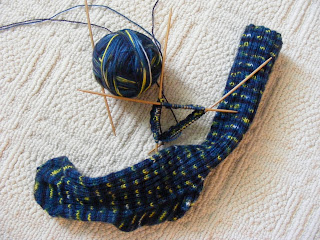 My daughter is also chanting the mantra, "Knit Faster!" as these are her socks. Basic ribbed design, in Dyenamics colorway Starry, Starry Night. Believe me, these are not all on her list, she has ideas about a pair of fingerless mitts...
Meanwhile, Chicken Mamas - Don't forget our feathered friends in the cold - we swath all combs, wattles and tender parts in Vaseline for the cold weather to prevent frostbite. Liberal application, frequently.
Stay warm!

Meanwhile, Chicken Mamas - Don't forget our feathered friends in the cold - we swath all combs, wattles and tender parts in Vaseline for the cold weather to prevent frostbite. Liberal application, frequently.
Stay warm!
Wednesday, January 02, 2013
Rendering
Lard, that is..
 Not much to look at, I realize. But when we had our pig butchered, leaf lard was one of the products we got back. (We had to request it, actually. Many butchers keep it and sell it to willing customers if the uninformed aren't smart enough to ask for it.)
Leaf lard is the highest grade of lard. (Didn't know they graded that stuff, did you?) Lard is pork fat, BTW. I, like many, thought it referred to just fat in general. It comes from around the kidney/loin area of the pig and is highly prized because it is an excellent neutral-flavored cooking fat for moist, flaky pie crusts. (Pie crust? I'm in....)
The rendering is quite simple. Just cut the lard into small cubes. If you notice, it does not cut completely smoothly like butter, but has some residual "threads" of gristle (that's what rendering separates out...more about this stuff in a minute...). Put just the slightest amount of water (about 1/4 cup) in the bottom of the roasting pan. Add lard, and heat in the oven on a low temp - I use 250 degrees. Think low and slow. (Crock pots on low also work....)
Stir it occasionally as the fat melts. The "cracklins" begin to form - they are the strings of pork you felt as you cut that cook out during this process. Pork rinds! They are actually quite tasty and have uses - don't waste! Once the cracklins settle, remove pan and pour the liquid fat through a fine strainer or cheesecloth into canning jars. It will keep in the fridge for a month or more.
 This jar is actually darker than usual (I let the lard render longer than I needed - got distracted...imagine that!) But it will cool to a nice creamy white-ish color.
I told you to save the cracklins - also know as chiccharrons in some Mexican recipes -

Leaf lard is the highest grade of lard. (Didn't know they graded that stuff, did you?) Lard is pork fat, BTW. I, like many, thought it referred to just fat in general. It comes from around the kidney/loin area of the pig and is highly prized because it is an excellent neutral-flavored cooking fat for moist, flaky pie crusts. (Pie crust? I'm in....)
The rendering is quite simple. Just cut the lard into small cubes. If you notice, it does not cut completely smoothly like butter, but has some residual "threads" of gristle (that's what rendering separates out...more about this stuff in a minute...). Put just the slightest amount of water (about 1/4 cup) in the bottom of the roasting pan. Add lard, and heat in the oven on a low temp - I use 250 degrees. Think low and slow. (Crock pots on low also work....)
Stir it occasionally as the fat melts. The "cracklins" begin to form - they are the strings of pork you felt as you cut that cook out during this process. Pork rinds! They are actually quite tasty and have uses - don't waste! Once the cracklins settle, remove pan and pour the liquid fat through a fine strainer or cheesecloth into canning jars. It will keep in the fridge for a month or more.

I told you to save the cracklins - also know as chiccharrons in some Mexican recipes -

This time we used them heated in a nice green tomatillo salsa, then loaded into tortillas with black bean refried beans. Don't forget the dollop of sour cream.....
Thank you again, Mr. Pig!
Subscribe to:
Posts (Atom)